Microsoft Word has always been the best word processor to use for index creation because it deals so well with large file sizes. I don't know many people who buy Word a stand-alone product anymore, most people get it through the Microsoft Office bundle. If you aren't currently running Office and you want to try it out, the Beta copy for Office 2007 can be downloaded from the Microsoft Site for $1.50.
As I wrote in my article about book contracts, some trade publishers will include a clause where they charge the author for index creation, often at a rate of several dollars per page. My advice in this case is to do your best to get rid of that clause, or it will cost you a good chunk of royalties. Another option which is common with many academic publishers is to give the author the option to create the index, under some time pressure, after the book is typeset. Now that I think about it, I did the index for my first McGraw-Hill book since the contract gave an either/or option, either I’d do it or they’d charge me to have a professional indexer do it.
I've helped a couple friends in academia create indexes for their books in Word, even though the publisher only supplied a text file and a printed galley. It turns out to be a simple process once you get the hang of it. Just paste the text file into Word, and set the page size to be larger than the page size in the printed book. Then, page by page, manually insert page breaks (you can use the pull-down menu or CTRL-Enter) in the Word file to force the page lengths to be the same as the printing supplied by the publisher. If you aren't a fast skim reader, just use the Search function to find the last couple words on the end of each page. It might take a couple hours, but it's well worth the time.
Once you have the complete text in the Word file with the proper page breaks, you can start marking words for inclusion in the Index. The pull-down menus for Word from Office 97, Office 2003 and Office 2007 are all different, but the key combination to mark a selected word (highlight with the mouse) for the index is ALT-Shift-X. The pop-up indexing dialog box is shown below:
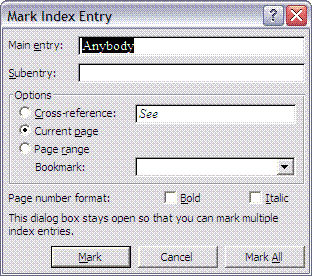
This dialog box has remained essentially unchanged through all the Office versions because they got it right the first time! Note that the dialog box remains open so you don't have to keep hitting ALT-Shift-X for every new entry. You just highlight a new word for the index, then click in the dialog box to return the focus there. Once you've marked all the index entries you want, you just use the Insert Index command from the pull-down menu, and a full index is dropped in place. If you need to change the page layout at a later date, the entries remain marked, and a new index can be generated with one click that will reflect the correct page numbers, just like creating a new Table of Contents in Word.
It's also worth experimenting with the indexing options to see how they work before you index an entire book. I would exercise caution using the "Mark All" button, which does a universal search on the word you have highlighted and adds all occurrences of the word to your index. That may be fine with proper names if you want every instance in the index, but it can create a real mess with common nouns or names that are used multiple times on a single page. Word even lets you create a subentry if you have a good memory for what other related items you've indexed.
No comments:
Post a Comment